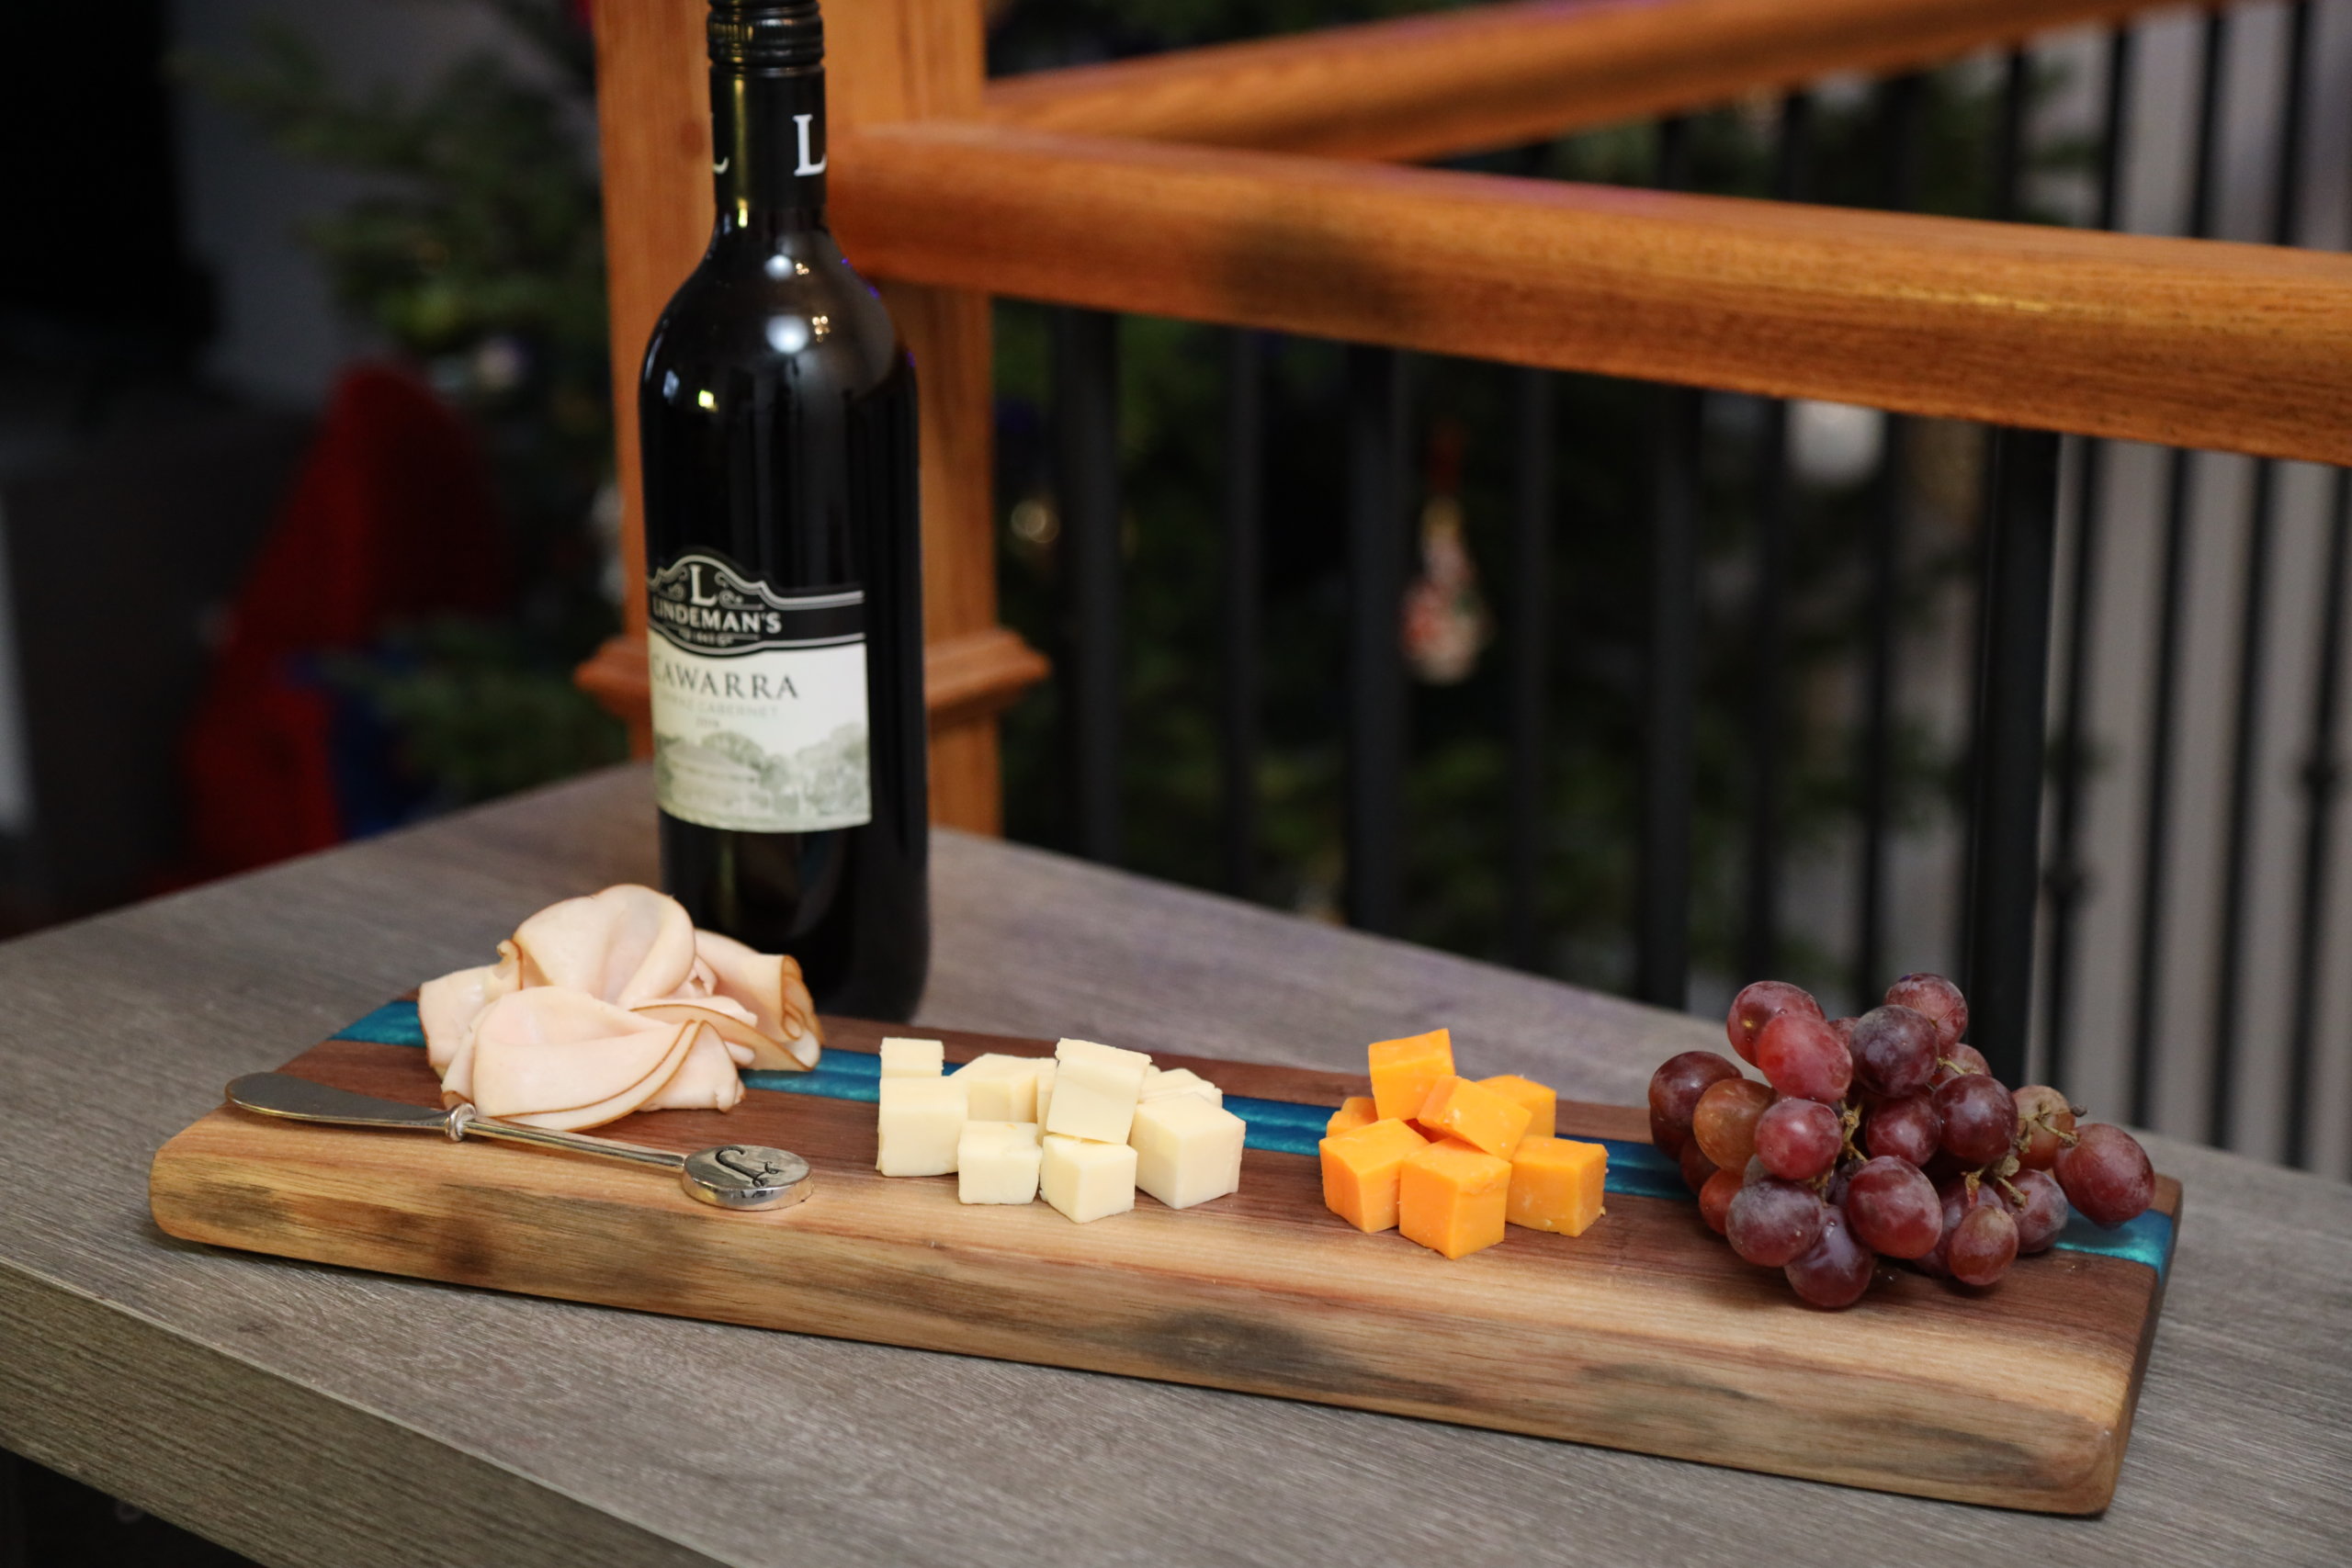
Epoxy Live Edge Charcuterie Boards

Supply List:
- Table saw
- Orbital sander
- Sandpaper—80, 120, and 220 grit
- Sanding block
- Wet/dry sandpaper—1500 grit
- Clean rags
- Beeswax
- Ecopoxy UV casting epoxy resin
- Ecopoxy color powder pigment
- Duct tape
- Measuring cup
- Plastic cups
- Gloves
- Mask
- Safety glasses
- Stir sticks or paint sticks
- HEat torch
- Live edge wood slab
- We used a 1 1/8″ thick black walnut live edge slab
Step 1:
Choose a piece of live edge wood or a wooden slab that is at least 1″ thick.
Step 2:
Remove any bark from the edge of the wood by scraping it off.
Step 3:
Step 4:
Use a sanding block to sand the groove. Start with 80 grit sandpaper and then use 100 grit. Clear all dust from the surface of the wood when you’re finished.
Step 5:
Place duct tape at each end of the groove, sealing it tight so the epoxy will not leak through.
Step 6:
Mix the epoxy at a 1:1 ratio. We are using the Ecopoxy UV casting kit for thin pours, which is a food-safe product and is great for projects like charcuterie boards or tabletops.
Step 7:
Pour a portion of the clear mixed epoxy into a cup, stir, and set it aside.
Step 8:
Add a scoop of the color pigment into a measuring cup along with the epoxy. Mix well.
Step 9:
Slowly pour the epoxy into the groove until you reach close to the top of the wood slab.
Step 10:
Add a small amount of the same pigment to the cup of epoxy you set aside and mix it, then pour it into the groove to create a texture trail effect within the groove.
Step 11:
Use the heat gun or torch to pop the air bubbles.
Step 12:
Allow the board and epoxy to dry for at least 48 hours.
Note: The Ecopoxy UV casting kit is typically used for 1/4″ pours and our depth is 1/2″, so this project has a longer drying time.
Step 13:
Once the epoxy is completely dry, remove the duct tape from each end.
Step 14:
Use the orbital sander and 80 grit sandpaper to sand the wood surface, then sand with 120 grit, finishing off with 220 grit.
Step 15:
Add water to the epoxy area and use a high grit wet sandpaper to buff out any scratches. We used 1500 grit paper.
Step 16:
With a damp rag, wipe the surface clean and let it dry completely.
Step 17:
Using a clean, dry rag, apply food-safe beeswax over the entire charcuterie board.
Step 18:
With a different dry rag, wipe any of the excess wax off the surface and buff the board by applying pressure in small circular motions. The hard you press, the more it will shine.
Step 19:
Let it dry, then you can add a second coat of beeswax or leave it as is.
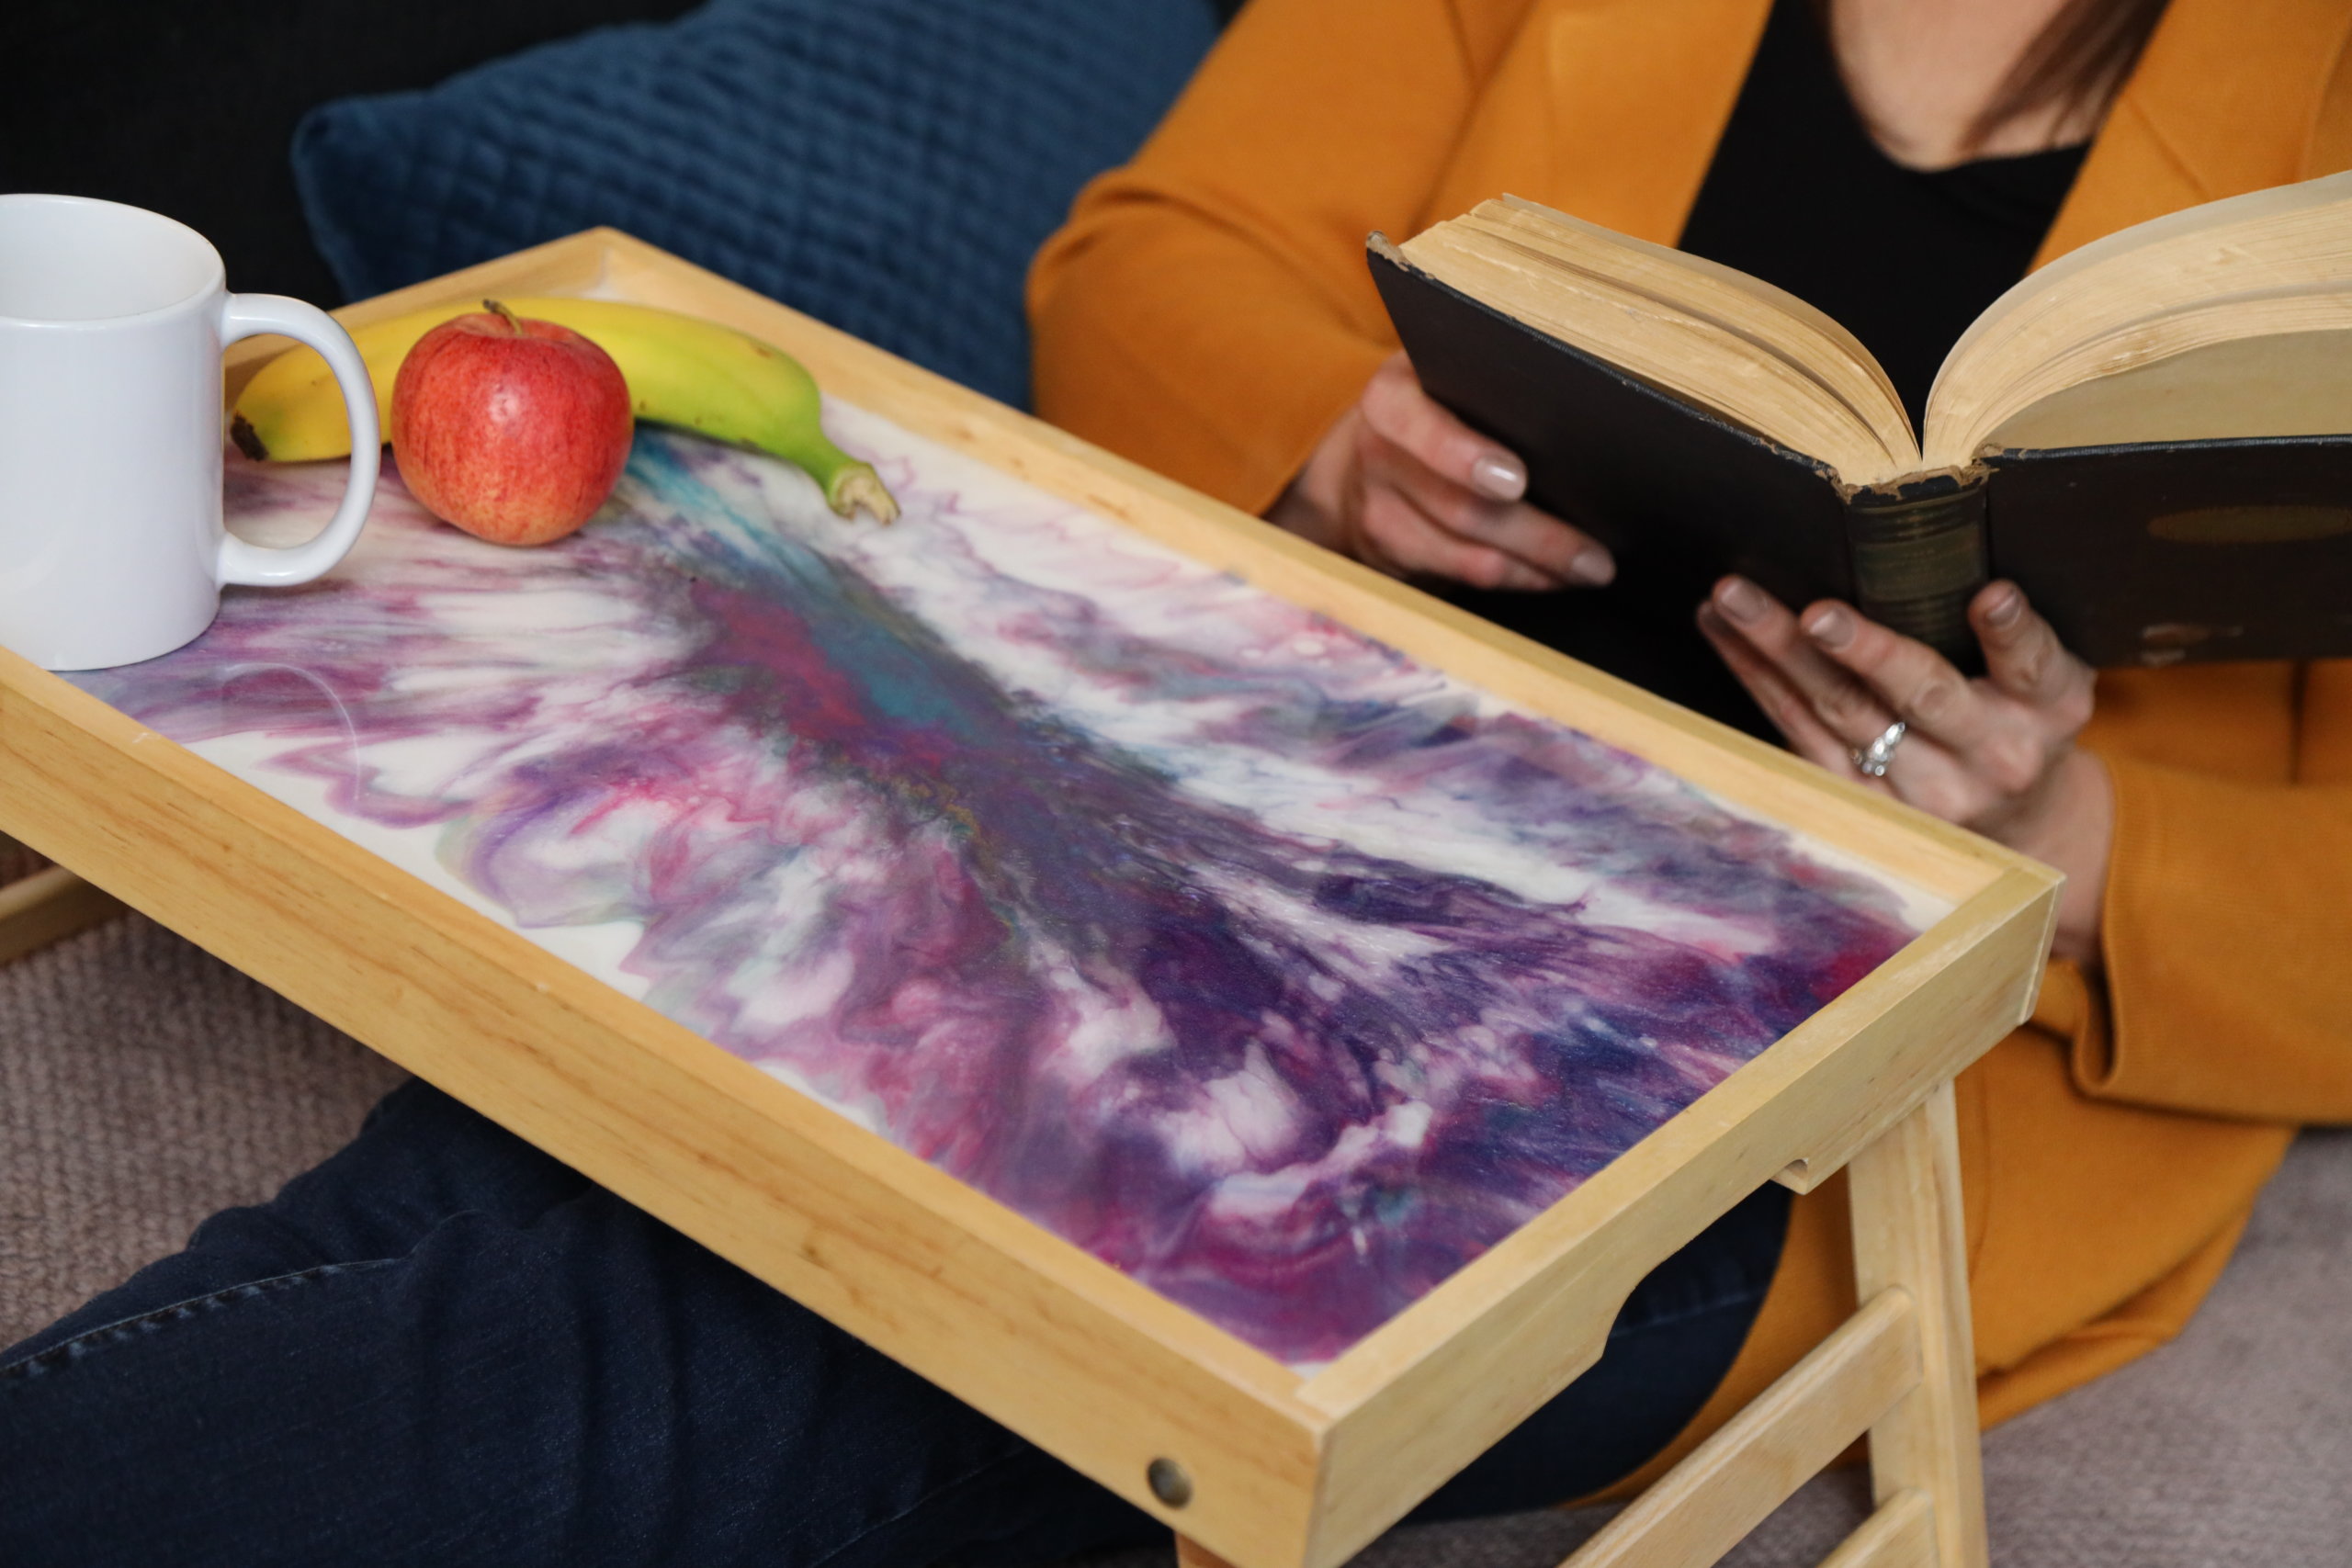
Epoxy Dutch & Puddle Pour Bed Tray

Supply List:
- Bed tray
- Ecopoxy UV casting epoxy resin
- Ecopoxy powder color pigments
- We used powder pigments in “pearl,” “ocean,” “bahama,” “pineapple,” “parrot,” and “royal purple”
- Heat gun or torch
- Hair dryer
- Stir sticks or paint sticks
- Tooth picks
- Mixing cups
- Plastic cups—big and small
- Gloves
- Mask
- Hot glue gun & glue sticks
- Rubbing alcohol
- Microfiber cloth or paper towel
Step 1:
Prepare the surface of the bed tray by cleaning it with rubbing alcohol and a microfiber cloth.
Step 2:
Use hot-glue to seal around the inside of the tray to prevent any epoxy from leaking through.
Step 3:
Prepare the epoxy by mixing it at a 1:1 ratio of hardener and epoxy resin.
Step 4:
Pour a portion of the epoxy mixture into a large plastic cup, adding the Ecopoxy powder pigment in “pearl.” Now pour the majority of this mixture into the center of the tray and spread it out with your hands so it reaches all the edges.
Step 5:
Heat up the surface with your torch or heat gun to pop the air bubbles.
Step 6:
With the remaining clear epoxy, separate it into five smaller 2ox cups and mix in the Ecopoxy powder pigments of your choice.
Step 7:
Puddle Pour the colored epoxy onto the surface. This means you will pour one color at a time, layering the circles on top of one another.
Step 8:
Pour the remaining pearl epoxy mixture around the exterior of your puddle pour.
Step 9:
With a hairdryer, start on one side of the puddle pour and use the air to push the white resin through the colors until it covers approximately half the puddle. Then do the same from the other side. Repeat until you have spread the colors over the surface.
Step 10:
Once you’re happy with your design, use a heat gun or torch to pop the air bubbles. Set it in a dust-free room to dry for 24 hours before using the surface of the tray.
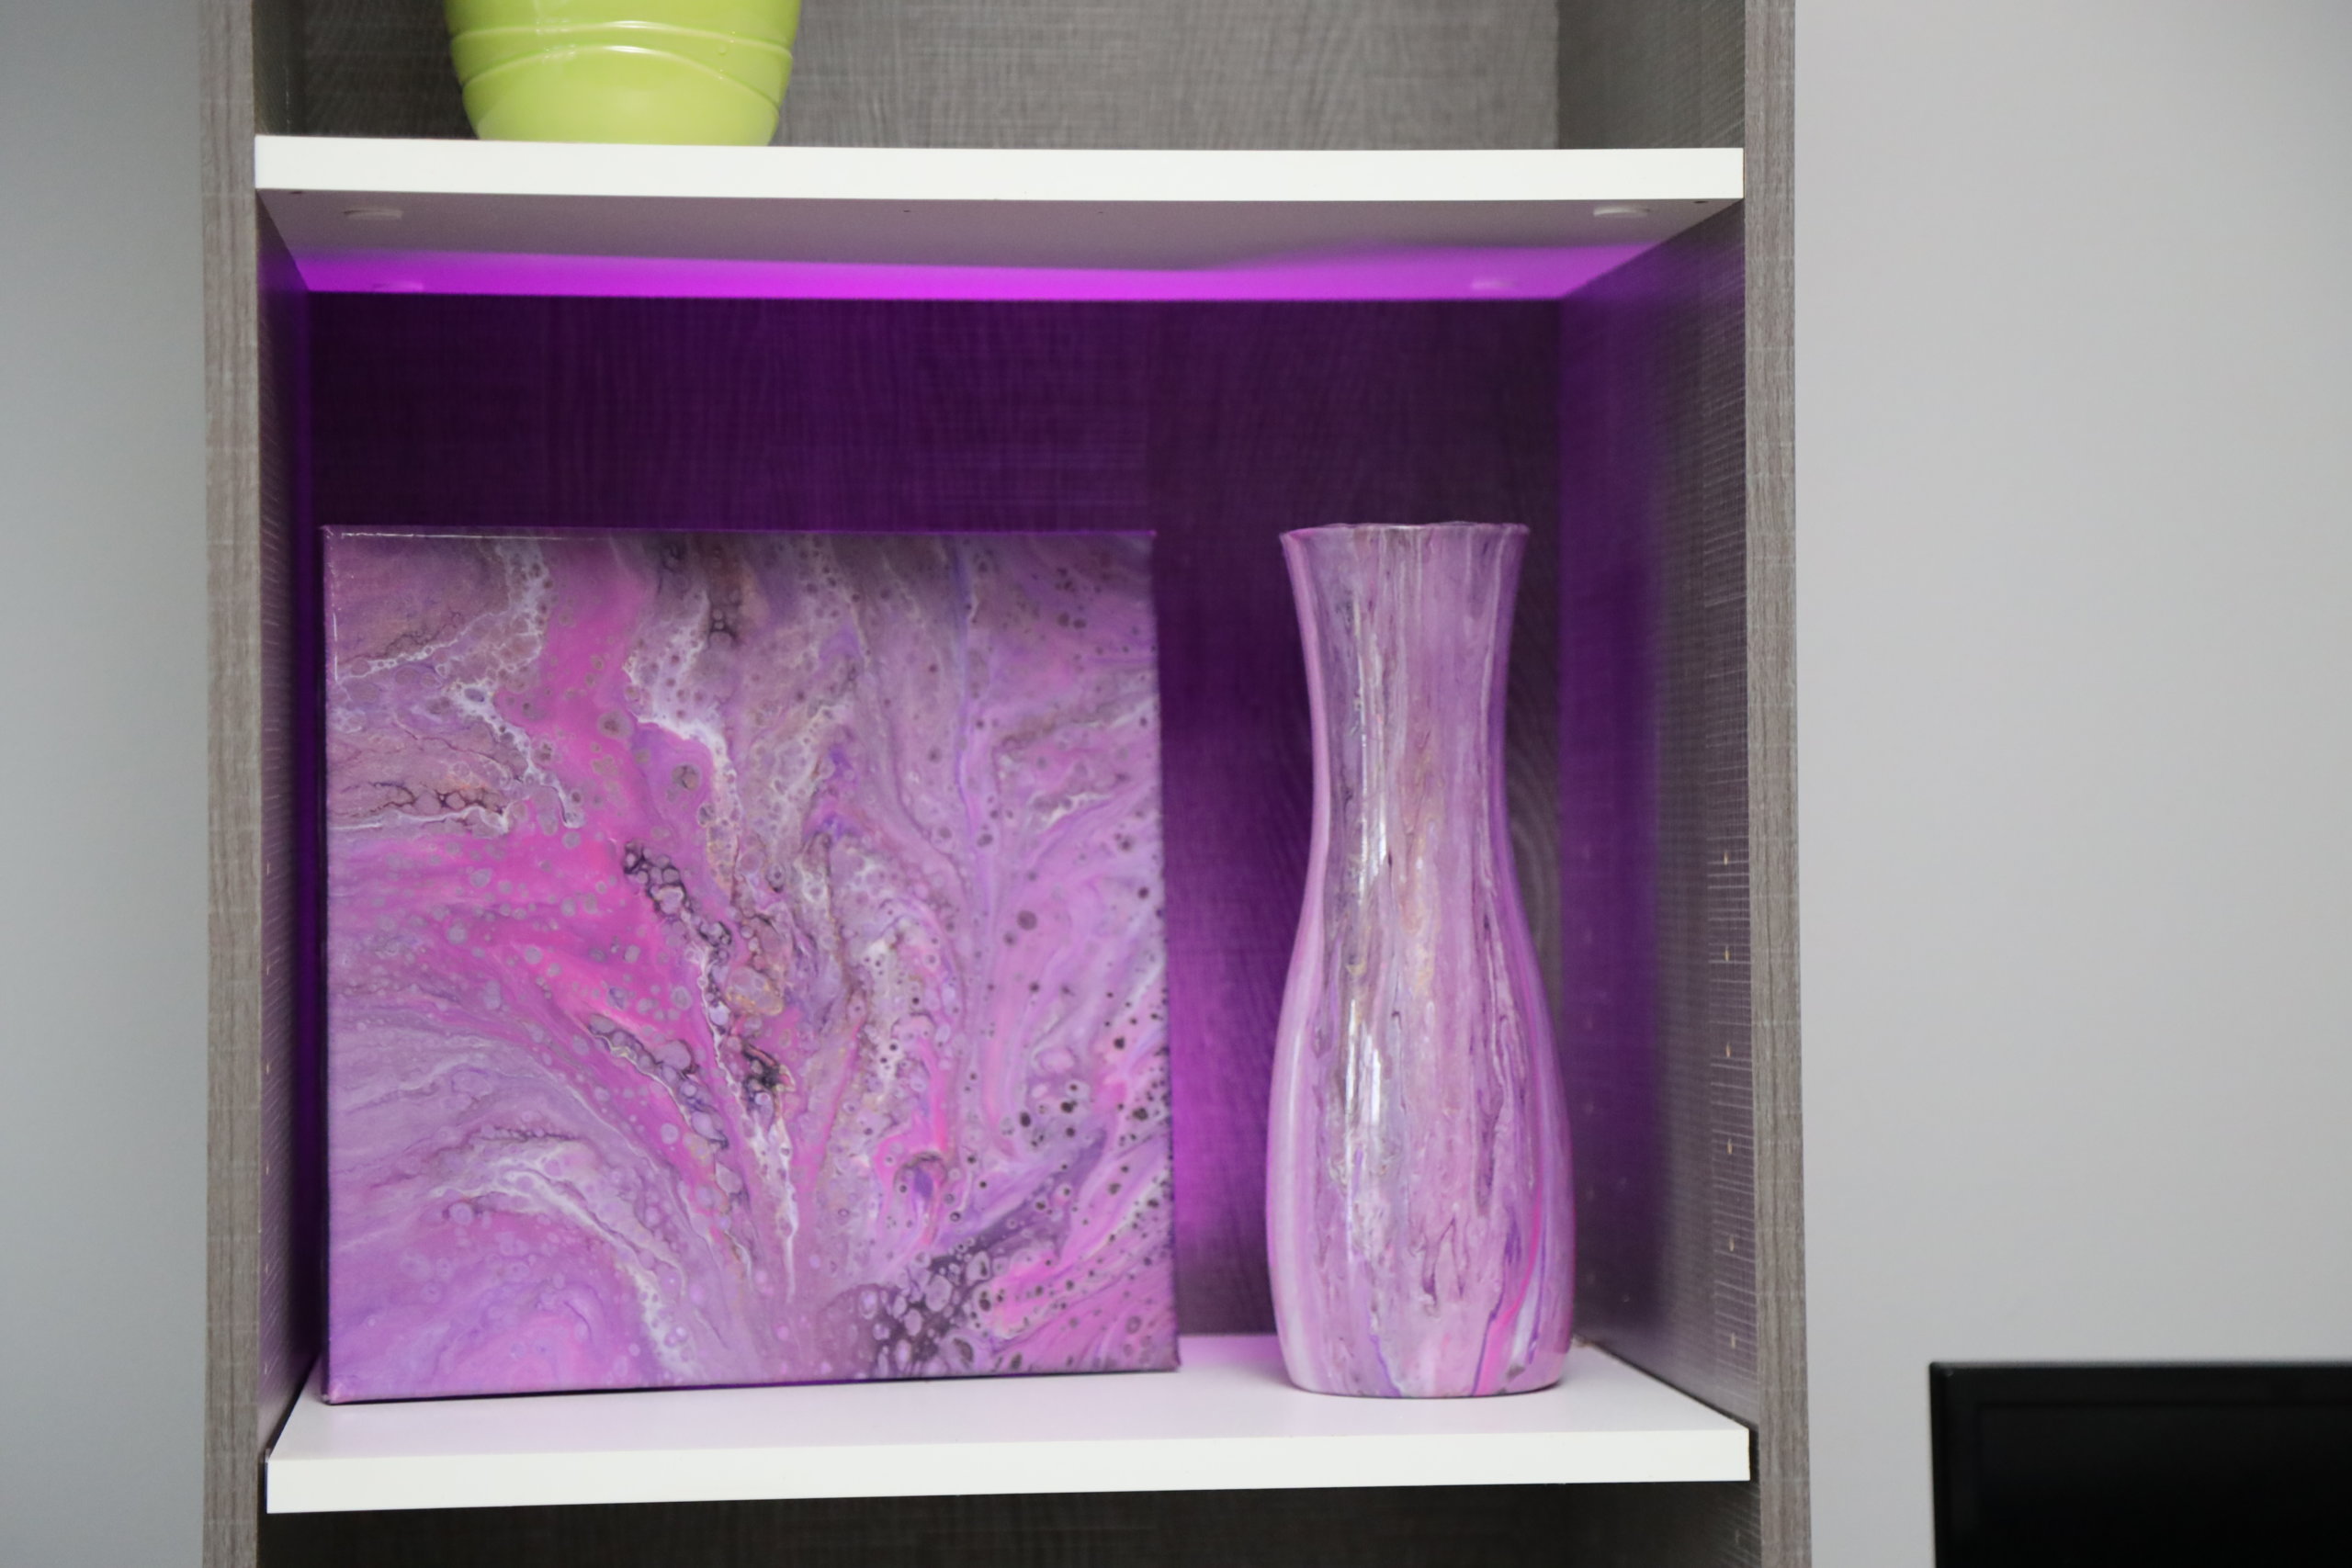
Dirty Paint Pour Technique on Vase

Supply List:
-
Vase
-
Resin Epoxy casting kit
-
Mixing cups
-
Large plastic cups
-
Stir sticks or paint sticks
-
Gloves
-
Mask
-
Square 10×10 canvas
-
Tarp
-
Tray to transfer the vase
-
DecoArt Fluid Art Ready to Pour Acrylic
-
Rubbing alcohol
-
Microfiber cloth or paper towel
-
Thumbtacks (4)
Step 1:
Pour all DecoArt fluid art flow paints into separate cups.
Step 2:
Slowly pour all your paint colors into one larger cup, layering them as you go.
Step 3:
Insert thumbtacks into the back of the canvas, placing one at each corner. Place the canvas face up on the tarp.
Step 4:
Clean the exterior of the vase with a microfiber towel and rubbing alcohol.
Step 5:
Place a plastic cup on top of the canvas that’s sitting on the tarp, then place the vase upside down on top of the cup. The cup will hold the vase in place while elevating it so you ensure the surface is evenly coated in paint.
Step 6:
Start by slowly pouring the cup of paint over the top of the vase. Use a wiggle motion as you pour—this is what is known as the dirty pour technique. The paint colors should squiggle back and forth.
Step 7:
Let the paint drip all the way down the surface of the vase, then transfer it to the tray by carefully grabbing the cup that the vase is propped on.
Step 8:
Pick up the canvas and start slowly shifting it, rocking it back and forth to allow the paint to flow over the surface.
Step 9:
Let both the canvas and the vase dry for at least 24 hours.
Step 10:
Once the vase has dried, mix your epoxy resin at a 1:1 ratio of resin and hardener. Mix for 5 minutes.
Step 11:
Pour the epoxy resin mixture over the vase, using your hands to evenly distribute it over the entire vase. This will give it a glass-like finish and protect the paint. It is a self-leveling liquid that will dry evenly, just watch it for 30 minutes to catch any drips along the vase rim.
Step 12:
Allow the epoxy to dry for another 24 hours before displaying your new dirty paint pour vase!
Once you’ve found the perfect place to display your new vase and matching painting, snap a few photos and share them with us on Facebook, Instagram, or Pinterest.


